Monday, September 28, 2015

Pumpkin Sneak Peek...

Hi friends! I hope you had a wonderful weekend filled with all of the fun activities that fall brings. We took the twinkies to the pumpkin patch with our sister-in-law and niece, and had such a wonderful time! Beautiful day, pumpkins, hayrides, apple cider... It was pretty perfect.

I'm up today on the Butterfly Reflections Ink blog with a pair of pumpkin-y and very technique-y cards to show you. I hope you'll stop by and check it out!!

I will be back tomorrow with an especially sweet birthday post in honor of my 30th birthday! See you soon.... I'm off to enjoy the last day of my 20's with my kiddos. Maybe we'll go get pie.... Who counts calories on their birthday?!

Saturday, September 26, 2015

Thinking of You

I have foxes on the brain. I think it was all of the sweet baby decor for our nephew's shower. Anyway, this darling image from Avery Elle's More Stories caught my eye, and I couldn't resist watercoloring him:


It's been quite a while since I used my Distress Inks for watercolor, and I'm so glad I pulled them out for this card. They are just the perfect amount of muted color for this sweet little fox, and particularly when paired with this subdued sentiment. I die cut the watercolored panel from my favorite Strathmore watercolor card stock using the Avery Elle Sweet Scallops dotted oval die, then die cut the orange panel using the coordinating scalloped die. I love the look of the no-line watercoloring, and decided to employ it on the sweet little banner. After it was dry, I fussy cut it out and adhered it to the watercolored oval, which was then popped up on the orange scalloped oval. The card base needed a little something, so I used a gold gel pen to create random dots all over the front panel. The edges were swiped with Papertrey Ink's Tea Dye Duo, and some Glossy Accents on the banner finished it off.


I hope you are having a wonderful weekend, friends! See you back here soon!

Thursday, September 24, 2015

So very blessed...

Hi all! Hope your week is going wonderfully. 

So, Tim Holtz debuted the new color, Wilted Violet, at the beginning of this month, and I was absolutely in LOVE. If I have one complaint about the Distress line, it's that there are not enough "feminine" colors. (I'm a prissy girly-girl, what can I say?) The colors released this year, while absolutely stunning and definitely important holes to fill in the line, have been pretty darn masculine. This purple is simply gorgeous. It's so vibrant and cheerful, but while also being deep enough that you can easily create more muted tones overall depending on your technique. When I received my order from Vanessa, I decided to dive right in with some ink blending. I first noticed this technique when Betsy Veldman did it during one of the PTI releases, and it's one that I think packs quite a punch.


 I began by die-cutting one of the new scalloped ovals included in the Sweet Scallops die set from Avery Elle. I heat embossed that gorgeous sentiment from So Very Blessed on the oval, then used my blending tool and the Wilted Violet ink pad to create a deep purple halo around the sentiment. I purposely left the center of the oval lighter in color to draw attention to that beautiful calligraphic sentiment.


For the background of the card base, I decided I wanted to keep it simple and focus on that sweet little trio of roses from the sentiment. Since the sentiment stamp is all one piece (yay for not having to try to line up the laurels on both sides of the sentiment!), I turned to my Wplus9 Fresh Cut Containers stamp set to find a little hand-drawn rose image. There is a single rose image that I stamped in clusters of three to mimic the cluster of flowers on the sentiment, with the lighter, bottom layer stamped in Memento's Lulu Lavender and the top layer in the new Wilted Violet Distress ink. I added the little leaves in Hero Arts' Emerald Green ink. It still needed just a little something, so I added tiny, random gold dots with the tip of my gold Wink of Stella. Some pop dots under the scalloped oval added just enough dimension to finish it off. 

I hope you enjoyed this card! I have had a couple of large (ahem, HUGE) orders come in over the last few days, so I've been busy playing with everything. I will hopefully have some new, fun stuff to share with you tomorrow and Saturday! I also need to get started planning my kiddos' second birthday party.... How is it possible that they will be two in a little over 6 weeks?!?! Anyway, have a great Thursday, friends! 

Monday, September 21, 2015

BRI Sneak Peek!

Hi friends!

Just popping by to say that I'm up on the Butterfly Reflections Ink blog today with the full details of this card:


I hope you'll stop by a take a peek!

Hope your week is off to a great start!

Saturday, September 19, 2015

My first Stampin Up! set....

Hi there! I hope you are all enjoying this beautiful weather we are having.... We took the kiddos to our town's Autumn Fest and the parade today, and it was so much fun to see them people watching and trying new things to eat. The weather finally has that crisp nip in the air, and it truly feels like autumn may be upon us. (Let's hope so, anyway!) I'm totally ready for cozy sweaters and soup and beautiful trees and pumpkin picking and apple picking and apple cake and pies and.... well, you get the idea. I'm just ready for fall and all of the fun that comes with it.

Today's card focuses on the beautiful sentiment from With Heartfelt Sympathy from Stampin Up!. It has a decidedly summery color scheme, because when I made it, it was still quite summery outside. I think it would look lovely in a more autumnal color scheme. 


Now, I've always been a little afraid of SU! simply because I'm a photopolymer kinda girl, and the idea of not being able to see where I was stamping kind of terrified me. I had heard that SU! recently started a photopolymer line, and I found a lovely woman nearby who sells SU! and placed my first order. I wasn't disappointed. Part of what attracted me to this set, other than the lovely, heartfelt, non-schmaltzy sentiments was the absolutely beautiful typography. I'm a sucker for gorgeous fonts, and when paired with beautiful, simple, useable sentiments, I'm all over it.


I thought this sentiment would look gorgeous combined with watercolor, and so I dug out my under-utilized Gansai Tambi watercolor set to create the color wash for the background. After heat embossing my sentiment with Princess Gold on some Strathmore watercolor paper, I used a shade of pink and orange to create the kind of melon-y color wash behind the sentiment. I don't like to use a lot of embellishment or fancy design on sympathy cards, so I decided to use a few blooms from the Papertrey Ink Vintage Blooms set. I heat embossed them on the same Strathmore watercolor paper and die cut them with the coordinating dies. My trusty Zig Clean Color markers were put to use on the blooms and leaves, since I don't quite trust myself watercoloring with actual watercolors and being able to create any kind of depth or shadows. (I know, practice, but who has the time to practice?) For the leaves, I simply die cut them, then heat embossed just the center lines to indicate the center of the flower in gold EP. I wanted the color to bleed all the way to the edges of the die cuts, so I didn't add any of the other images included in the stamp set for the leaves.


I popped up the die cut blooms to add some dimension to this fairly flat card. For the finishing touch, I added a few drops of Glossy Accents to emulate dew drops, and then I added a twine bow peeking out beneath one of the blooms.

I hope you enjoyed! :) Have a fabulous weekend, friends! 

Thursday, September 17, 2015

The Four Main Food Groups.

So, I purchased Elf'd from Ellen Hutson a while ago, like the day it was released. I couldn't wait to get my hands on that adorable little elf with the little smirk and cheeky sentiments. But then, I decided that I didn't want to start putting Christmas stuff on my blog until at least October, because then I might get burnt out, blah blah blah.

Well, yesterday I was doing some organizing (read: trying to clean up the massive mess that is my desk) and found this set. After re-reading the sentiments, I  couldn't wait any longer to put them to use, so I decided to make this card:


"Elf" is one of my favorite Christmas movies, though... don't shoot me for this... I really don't care for Will Ferrell as a general rule. (I hate how he portrays characters who are so idiotic that they couldn't possibly be real, but the movies are set in the present and not in some alternate dimension. Yes, I have thought about why I dislike Will Ferrell's movies to this level of specificity.) This line, "We elves...." pretty much describes my diet if I could eat anything I wanted all day long and still look okay in a pair of elf tights. I don't look okay in elf tights after eating halfway healthy, so I will just stick to putting candy corn and syrup in shaker cards.


I stamped a white panel of cardstock with Hero Arts Red Royal ink and Market Street Stamps diagonal stripe background stamp, then die cut the frame with the rectangular frame from PTI's Shakers and Sprinkles die set from both the striped panel, a piece of fun foam, and a scrap piece of green CS. I die cut the little smirking elf and his chosen foods from watercolor card stock, stamped them with Archival ink, and colored them with my Zig Clean Color markers (without using water). I stamped the candies and syrup again on the card base, along with the sentiment, then colored them in. Some sequins from Hobby Lobby and some faux snow from my Tinsel and Tags kit went inside the shaker along with all of the colored die cuts.

I hope you enjoyed this card! I think I've got the Christmas bug out of my system for a few more weeks, but be prepared for an onslaught of Christmas cards starting in October.

Have a fabulous day, friends!

Wednesday, September 16, 2015

Make a Wish....

"Make a wish, and blow out your candles."

This is one of my favorite birthday traditions.

I love the sheer possibility of it... The pure hope when you're young and are wishing for a new Barbie or book. When you're older, it means that maybe, just maybe, you're throwing your deepest hopes and dreams out into the universe with the wish that some cosmic force will deem you worthy of granting your heart's desire.

Or maybe it's just the last hurdle before people can dive into your birthday cake...

Whatever it means to you, it almost always means something magical... (yes, cake is magical if made by the correct person.)

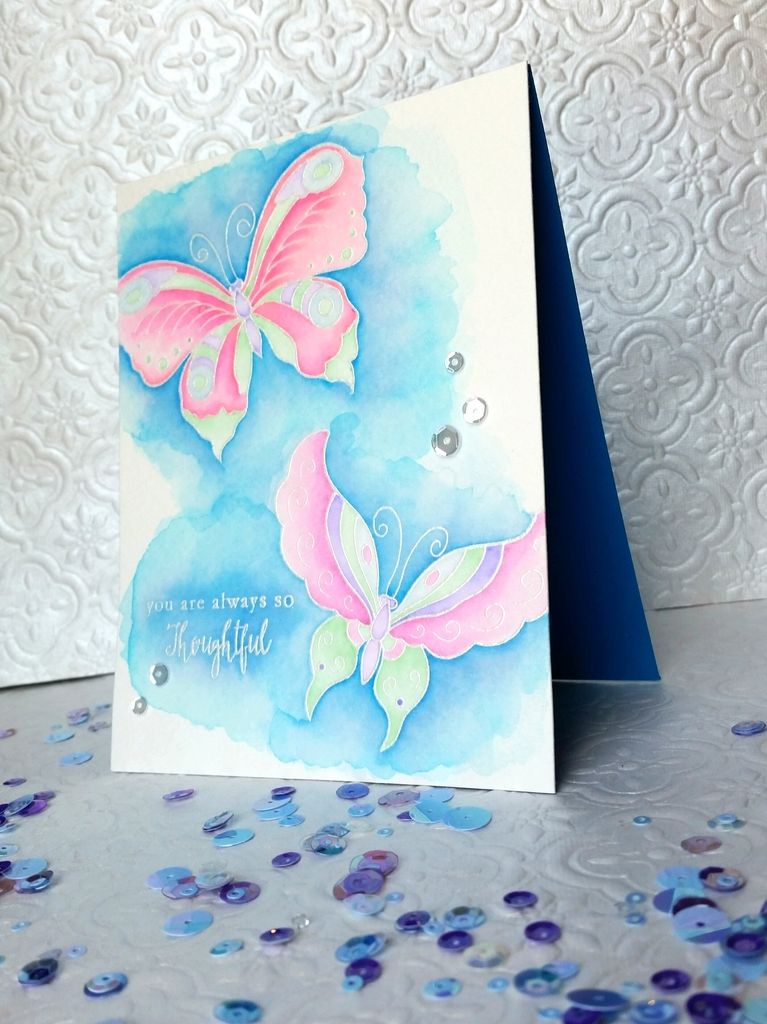
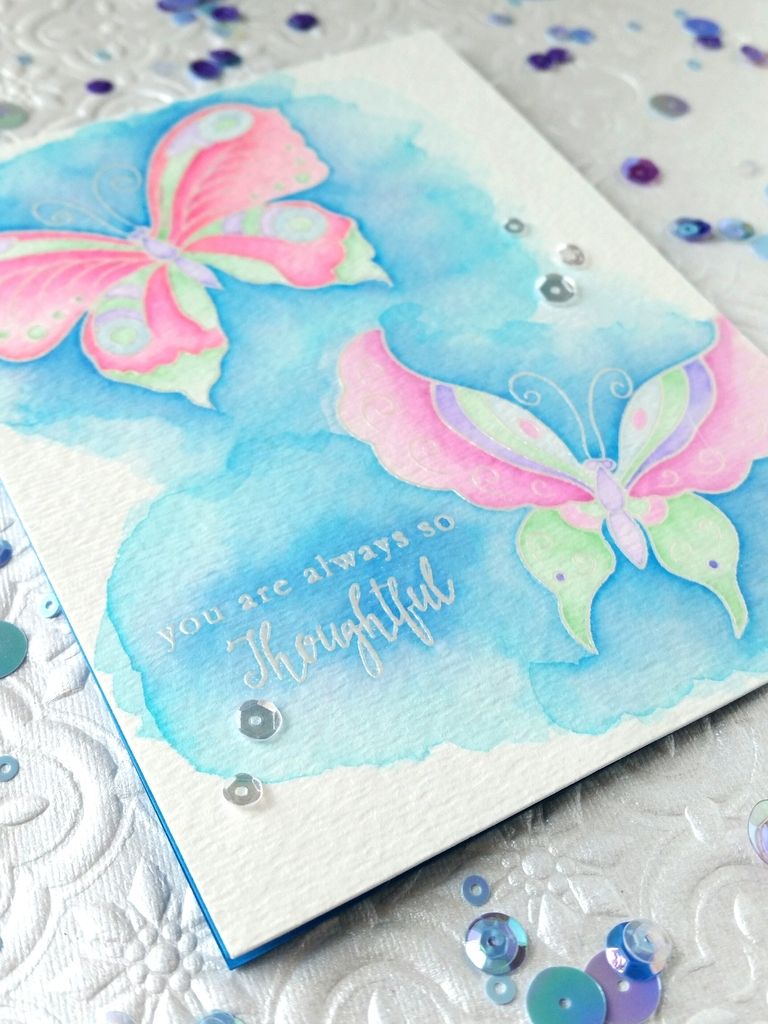
With that magic in mind, I present to you this card:


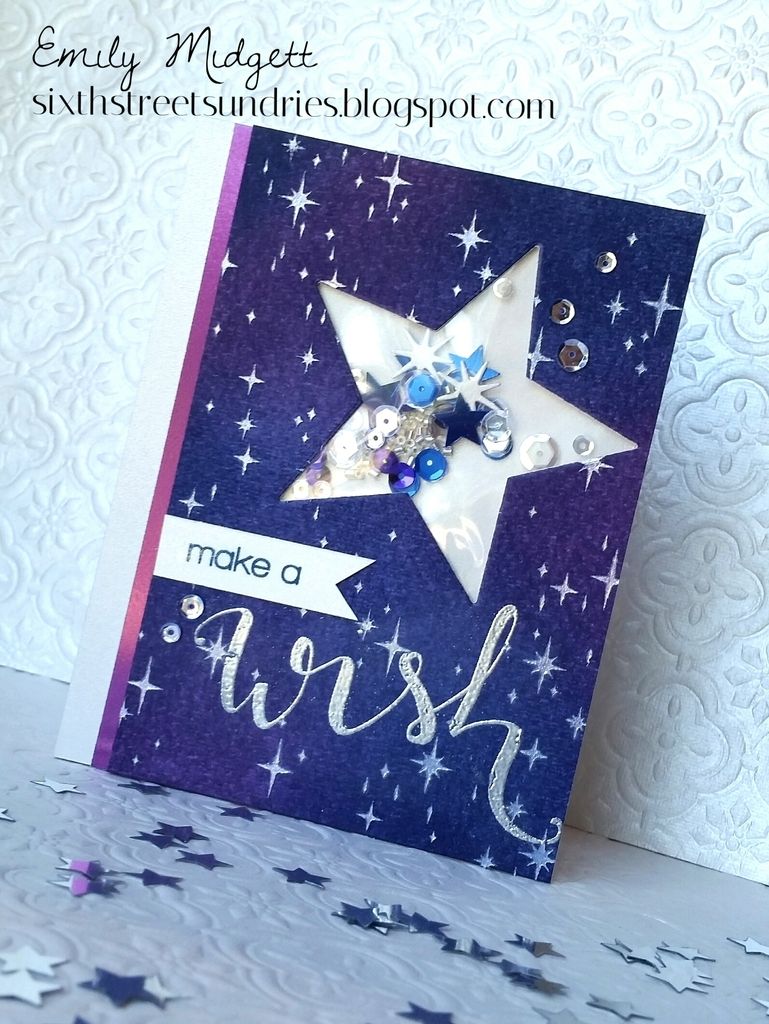
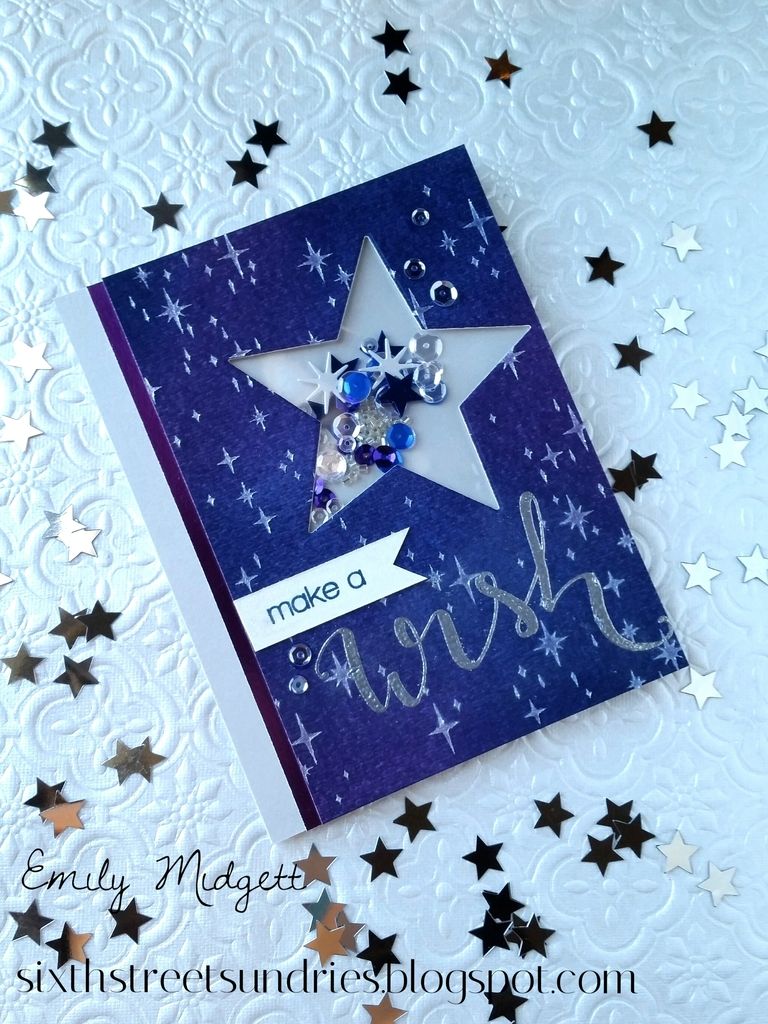
For this offering, I finally put to use a technique that has been popular for ages, but I've never been interested for the single reason that I might get messy: embossing paste and stencils. I used this Memory Box stencil and some Dreamweavers Pearlescent embossing paste to create the background after blending Dusty Concord and Chipped Sapphire Distress Inks on a watercolor card stock panel. I have to say, this technique is awesome. I can't wait to get my hands on some more stencils and put this embossing paste to good use.

After I spread the paste out and let it dry, I die cut the star from the panel using Wplus9's Clear Cut Stackers: Star (the middle size). It's not quite the right star shape for what I initially had in mind for this card, but I went with what I had. The sentiment from this absolutely wonderful and versatile Make a Wish set from Create A Smile was kinda tricky; I had initially intended to do something with vellum, but it just didn't look right. I ended up heat embossing the sentiment on the panel over the top of the paste stars in silver embossing powder. I created a little shaker pocket using my WRMK Fuse tool and some sequins I had in my stash.

After doing all of that to the main focal point, I had to continue the magic with shimmer and shine on the rest of the card. I used a strip of purple DCWV foil card stock and some dove gray Neenah shimmer paper as accents on the side of the star panel. I mounted it on a gray card base and called it quits.


I hope you're still with me after all of my rambling about magic and birthdays and cake! I can't wait to try out this embossing paste technique again. Tomorrow I'm back with a Christmas card that is sure to make you feel like smiling, cuz smiling's your favorite. ;)

Monday, September 14, 2015

BRI Sneak Peek...

I am up on the Butterfly Reflections Ink Blog today with an elegant card based on a dress I found on Pinterest. Head on over there and check it out!


Saturday, September 12, 2015

For the love of foxes!!

Warning: photo heavy post ahead!!

Today, we celebrated the impending arrival of my little nephew. We are so excited for this little guy... He will even out the numbers of the grandchildren on my husband's side of the family, making it two boys and two girls in less than two years haha! Since I'm obsessed with party planning, I volunteered to do the decorations, and with the help of my other sister-in-law, I think we nailed it!

When my sister-in-law told me that she was loving foxes for my nephew's room, I immediately decided on a woodland/fox theme for the shower. My Cricut Explore does not get enough love from me.... unless I have a party to plan, and then it's worth its weight in gold! I used the new Lia Griffith Four Seasons cartridge for the majority of the decor, including the shadow box frame with baby's name on it. A personalized banner, some picks for the diaper cakes and flowers, and the guest "sign in" we're all done with my trusty Explore. I used the sweet little fox image from the Make It Market Wee Folk mini kit and the lovely wreath image from the Lovely Laurels kit to create tags for the bases and the little chocolate boxes at each seat.

I of course had to make a matching card to go with the gift, and so again put to work my Wee Folk Make It Market mini kit to create a fun (and totally flat!) Shaker card.

Here are some photos from the shower.... And the card and gift! (Apologies for the quality on a couple of them... I was hungry and my hand was shaky haha! Hope you enjoy! Have a fabulous weekend, friends!

Wednesday, September 9, 2015

So very thankful....

My life rocks. I don't mean to say that in the sense that I'm bragging... I just mean that I have so much for which I am thankful. I created this card with that thought in mind:


I started out with 2 panels of Strathmore 300 lb watercolor paper and blended Ripe Persimmon, Wild Honey, Mustard Seed, Spiced Marmalade, and Festive Berries Distress Inks on them. I then die cut Lawn Fawn's Stitched Leaves out of one of the panels. I love the variegated colors on these leaves; combined with the intricate stitched details from the dies, they almost look real! I then cut a small piece of vellum, which I treated with my anti-static tool and heat embossed the sentiment with gold embossing powder. I mounted the vellum panel to the second inky panel with some Kool-Tak clear dimensional adhesive, which I placed strategically behind some of the thicker letters and beneath the leaves.  Some sequins finished it off. 


I love that sentiment from Neat and Tangled. The idea that we should let our lives be full of not just thanks, but also giving, is one that I really love. This is an area of my life in which I'm not active enough. Jennifer McGuire has a stamp that says "share handmade kindness," and it's totally inspired me. I want to do more. I am so incredibly lucky to have so much, and I've decided I want to start sharing. I'm going to start by sending a box of cards to my grandmother's nursing home. If anybody knows of any organizations (something similar to Operation Write Home), I'd be grateful if you'd give me a heads up.

I hope you're still with me after that semi-maudlin post! I just have been feeling incredibly lucky these past few days... We had a wonderful weekend beginning my month-long birthday celebration by going with some friends to The Melting Pot (our first time!) and discussing some travel plans. I really took some stock in my life, and I came to realize that I really love my life, even if I am going to be 30 in 20 days. (ha!) What are you thankful for?

Monday, September 7, 2015

My first Design Team post!!

Hi all!

I'm up on the Butterfly Reflections Ink blog today (for the first time... eep!) with a duo of baby cards.

Here's a little sneak peek:


Also, Vanessa is still running that incredible Labor Day sale through tonight! 20% off your entire purchase, including sale and clearance items! Go check it out!!

Saturday, September 5, 2015

Watercolored Butterflies and a sale

Hi all!

I hope you're having a wonderful holiday weekend. My mom is going to be visiting us for a few days, so I had to get a quick blog post in before we got busy doing stuff! I received my first order from Butterfly Reflections Ink a few weeks ago, and in it was the Altenew Bejeweled set. As soon as I saw this set, I knew it would be stunning done in watercolor. (Me? Love watercolor? Shocking, I know.) I love beautiful, subtle color washes, and that was the initial intention with this card, but it ended up a bit brighter and more vibrant than I intended. I'm totally okay with it either way. 


I first prepped my Strathmore 300 lb cold press watercolor card stock with an anti static tool, then heat embossed the butterflies and sentiment with Silver Pearl embossing powder. I love the subtle pearl finish from this embossing powder, especially for super elegant cards like this one. It goes so nicely with the pretty pastel watercoloring. I then colored the images with a variety of pastel shades from the Zig Clean Color line. To achieve the color wash around the edges of the butterflies, I first started with the Shadow Mauve color, then after I had blended it out and it dried, I went back in with a very small amount of Cornflour Blue and blended that with the Shadow Mauve (I believe this technique is called "glazing"), which I then blended out with my water and paint brush. I accented with a few sequins just to add some sparkle.


I hope you enjoyed this card and have a fabulous holiday weekend!

PS- speaking of the holiday weekend, Vanessa at BRI has a fabulous sale going on now through Monday: 20% off your entire purchase! (That includes sale and clearance items!) Just use the code LABORDAY2015 at checkout. 

Tuesday, September 1, 2015

Big news!!!

I have some big news.

It's my birthday month. Yes, it is the month that I turn 30, but instead of mourning that my 20's are nearly complete, I'm going to celebrate all month long. (I haven't informed hubby of this yet, but I'm suuuure he will be totally on board. HA!)

But now to the most exciting news:

A few weeks ago, I auditioned (my musician brain calls it an audition, but I don't think that's the correct term. Just go with it.) for the Butterfly Reflections Ink Design Team. I was terrified. Now, in high school, I auditioned for the musical my first semester of my freshman year, didn't get chosen, and never auditioned again because I got my feelings hurt. Yes, it has been 15 years, and I still am a little heartbroken that I didn't get chosen. I have been afraid that if the same thing happened with paper crafting, I would have the same heartbroken feelings and the whole thing would lose its luster. (silly, I know) Then I told myself to grow up, that I will never know if I don't try. So try I did. 

And to my surprise and delight, I was one of the lucky chosen! Yay!! I can now officially announce that:


I am honestly over the moon thrilled and thankful that Vanessa was kind enough to give me a chance. The four other ladies chosen for the Design Team are incredible, so I really feel privileged to be among such talented company! Vanessa is an incredibly kind, industrious, fabulously fun person, and her shop is incredible! Great prices, and you can't beat her awesomely fast shipping. (Seriously, I ordered Wednesday afternoon and had my package Saturday, from New Hampshire to Illinois.) If you've never visited her shop, go check it out ASAP!!! Butterfly Reflections Ink store

I also hit another personal goal last week: 300 followers on Instagram! So many things for which I'm thankful.

To celebrate my milestone and because I'm in an awesome mood due to all of the good news (except for that whole "turning 30" thing...), I'm going to give away an unopened Altenew stamp set: Birthday Wishes! I will create an Instagram post, and in order to win, you must share my Instagram post AND be a follower on Instagram (I will check!!!). Find me on Instagram: my name is eamidgett. I will choose the winner from Instagram a week from today- Tuesday, September 8 at noon, centeral time. Good luck, and thank you to Vanessa for giving me this opportunity!